| Amateur
Folding Boat Builders' Corner Discussion Mailing List
|
by Peter Chopelas
How many people out there are crazy enough to attempt to build their own folding boats? I built mine with an aluminum frame, nylon skin with hypalon paint, mostly to keep the weight down. Took way more work than I realized (probably would have just bought one if I knew how much work it was going to be). The problem now is I like it so much I have to make another one with all the "bugs" worked out to get it just the way I want it.
After building a skin on frame kayak it came together so nice and fast I too thought a more portable kayak would be a fun project to build. Though I did not realize how much extra work that was going to be.
You see, unlike the conventional construcion of SOF, where you simply stretch and shape the frabric over the frame, you actually have to cut and sew the skin separately from the frame. If done acurately it will fit, though on something as fexable as a kayak frame, and stretchy as a fabric skin, making a perfect fit without a lot of trial and error is unlikely.
Also I did it on the kitchen table (after the rest of the family went to bed) each night. This required putting everthing away each time I was done for the night, and getting everyting back out the next evening.
The table was too small of course to lay it out completely making accurate cut and sewing problematic. In addition I used my wife's home sewing machine and it really could not handle the multipule layers of fabric and webbing. I put a lot of wear and tear on that little machine from this project. Sewing the heavy fabric can still be done if you are cleaver with your seam build ups and use a fairly light weight thead (home sewing machines just can not handle the heavy nylon thread I wanted to use). But the light thread means I had to make multiple passes to make the seams strong enough. It works but this increase the amount of sewing two or three times.
One of the most serious detriments to using a home machine to do the sewing on such a large item is that the little wimpy feed dogs can not pull the fabric through very reliabley, espcially since nylon is so smooth and slippery. So I had to bunch all the fabric up on my lap and between my arms and very carfully feed and guide the fabric through the foot and needle. This was very tiring and led to many resewings because of misalignments of the peices. (like most experianced sewers I do not use pins or clamps to hold it togeather since it takes too much time, though I had to on this job).
The fatique becomes as much an problem as anyting else, espcially since the only time I could work on this was late at night, I had to sew the coaming on three times for example, I put it on backwards twice! (arrgh!)
Using even a simple straight stitching industrial sewing machine with a layout table attached to it (like sail makers use) would have saved a lot of work. If I had a chocie I would use a walking foot machine with #10 nylon thread. A seam tape attachment guide would have been helpful too. If/when I do another one I will find a used industrial machine to borrow, rent or buy (then I have to find a place to put it!).
Since I was working with uncoated fabric I had to sear all the edges by hand to keep them from unravelling. Even if the ravel was not a problem this makes the seam much stronger and a good idea in anycase. If I had a hot cutter, and layout table where burning the surface is not a big deal (I doubt I could convince my wife of that about the kitchen table) then this would have saved a lot of time too. I had to re-sear the edges each time I retrimmed the excess fabric for the seams after they were sewn as well.
Since I worked without a pattern (I took measurments directly off the frame and transfered them directly to the fabric) I had to assemble the kayak many times to check the fit and make adjustments as I was making it. Also very time consuming. A good acurate pattern, with all the fabric stretch accommodated would have saved about 66% of the sewing and cutting time.
To make matters worse I incorporated my own ideas for assembly details, and tensioning methods that to my knowalge has not been done before (I wanted to keep the weight down, and keep it simple). So I was developing new details as I went as well, adding to the time to build. Most worked BTW but nearly all needed some massaging as I went because unforseen problems kept cropping up.
Pretty normal type of problems, but each one had to be dealt with, and often resulting is resewing some of the details.
None of this is necessary with conventional SOF construction. Applying the hypalon was fairly straitforward and was the least of my difficulties.
Though there are things I would do differently here too, I had sewn all the deck rigging I wanted on the top side to the uncoated fabric and then painted around the rigging to water proof the deck. It worked but is kind of messy and makes getting a nice finish on the topside impossible. Next time I will use precoated fabric on the deck and just seal the seams only from the inside. And I would paint the outside of the hull from the gunwale seam down only with the sealant.
I found I can minimize the sticking of the hypalon to the frame through the fabric by simply using the hypalon right out of the can without thinning it and rolling it on the outside of the assembled kayak. It sticks so good I see no reason to get deep penetration into the fabric matrix, all that would do is add a lot of toxic vapors to the air and cause it to stick to the frame. Beside you need fewer coats if you use it without thinning, saving time.
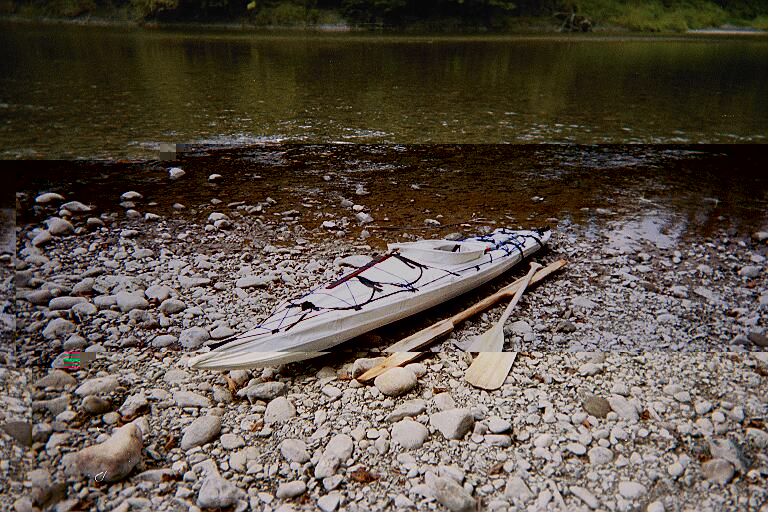
I patterned my design after the North Alaska Retreival kayak, to keep it compact and light since I wanted it to take packing into mountain lakes. I got the offsets from David Zimmerly's web site, though I made a few alerations to the size and the stern to improve tracking.
It came out at 10' 4 inches long, 23 inches wide, and total weigh is only 14 lbs including the seat and back rest.
Behavior on the water
The retreival kayak I felt has pretty good "at rest" stability, with lots of ability to lean because of good secondary stability (no doubt because of the flair in the gunwales). Though I had kind of a clutzy guy try it once and he promply rolled it and wet exited. So maybe I'm just used to it though I felt it was fairly stable. It is responsive and well mannered, quick to turn but I think with reasonable tracking despite it's length (no doubt because of the modified stern piece I put into it). It rolls nicely, smooth without requiring any exagerated body movements (hip flick and head dinks are really not required to get it upright).

It is real roomy too compared to Greenland style kayaks, and despites it's small size I mangaged to get about 70 LBS of camping gear and my 200 LB body into it for it's first trip. Though the rear deck was awash and I had water up to the coaming, but it was even more stable then.

I modified the stern so it would have a near vertical rise and kept the keelson low all the way to the stern so it would track better. I am told by people who have built it per plan that it wants to wander and changes directions quickly as would be expected with such a short kayak with rounded bow and stern. I know people have used these for surf kayaks and are happy with them for that, I have not tried that and probably will not. I made it light to take packing into the mountains, not to surf it. It would not penetrate waves well anyway because of it's lack of weight.
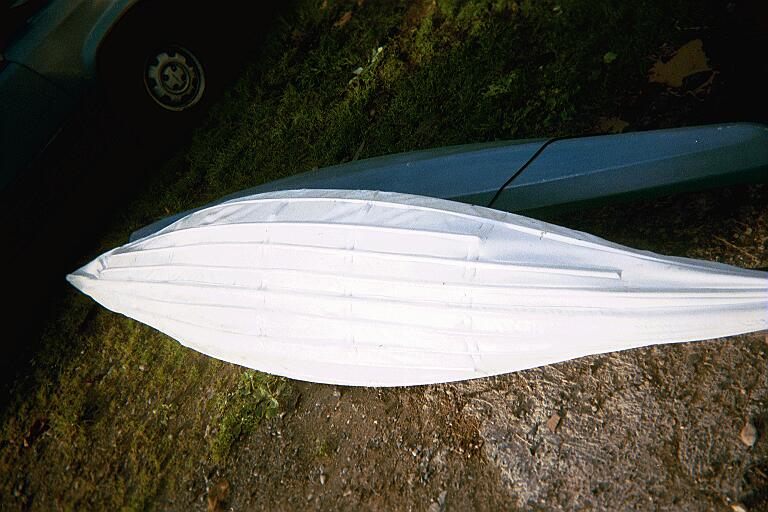
I only prebent the stringers and keel at the bow and stern to get the shape I wanted, the rest was well within the elastic flex of a strait tube, I used a combination of 1/2 inch and 1/3 inch diameter tubes, 14 stringers in all full or nearnly full length (counting the center deck stringer as one which is interupeted by the coaming). Though I think I would use more 1/2" tubes and fewer of them next time to make it a little stiffer and simplify assembly.
I tensioned the fabric with a simple webbing and fastex buckle arrangement. For both the long direction and cross wise, simple and light. You have to have some way to adjust tension because nylon expands and contracts with heat and moisture. This could be done with some kind of frame adustment but I could not think of a simple way to do this, though it would make for a nicer looking tight skin, as would inflateable sponsons (at a large weight penalty). I would not depend only on the fit of the skin to keep it tight on the frame. It will be difficult to assemble in warm dry weather and loose and baggy when it gets wet.
This might be possible to do with polyester fabric since it is more dimensionally stable but it is much harder to work with because of it. It would be difficult to get a good fit IMHO with a fabric with no stretch in it. I would not try it personally.
It took me about 3 months of evenings working real hard (and until 4 am on the day before the first trip!). My cost to build was only about $150. but I already had the alumminum tubes laying around in my garage from a failed tent making buisness from 15 years ago (they would be the most expensive componet). The 8 oz nylon and hypalon I bought from George Dyson and Co. in Bellingham. Best price I could find on the fabric, $6/yard and 72 inches wide! I bought exactly 12 feet of it and it was just enough with only small scraps left over.
If you bought everything retail you would probably spend about $350-400 to build one just like mine. Presuming you had a sewing machine and all the right tools to make it (pretty normal hand tools is all I had). Not bad really but that is due to the small size, a lot less material to buy.
It folds to about the size of a large brief case. It could break down further but I leave the frames in the skin since is simplifies the assembly. The stringers break down to 16 inch lengths (shock corded together like tent poles, whcih is what they are!). It makes a great compact backpacking boat, smaller folded size would be nice (I'm working on that) but it is light enough I can just strap it onto the outside of an internal frame pack.
I am also thinking about making a simple tent that uses a couple of stringers from the kayak. This would reduce the net weight even further. This way I can get a tent and the kayak for a total weight of about 16 LBS. Someone even suggested that the rain fly could double as a sail too. (not sure I want to try that!).
Disclaimer: All material is copyright by the original author.